In Part 2 of our recurve tuning guide you learned how to properly center the arrows for your recurve bow. This article is a direct continuation, so please make sure to read the previous parts before you read this one.
Bare Shaft Accuracy Testing
Now that you have the nocking point installed properly, the right brace height determined, and your arrows centered, we need to take a look at how your arrows are flying and how they hit the target to determine if further tuning is necessary, and if you should get different arrows for optimal performance with your setup.
To do that, you will need a few fletched arrows, as well as few bare shafts – the arrows without the fletchings. You can get some cheap bare shafts online, or you can just get regular arrows and remove the fletchings manually, thereby making yourself a bare shaft.
Porpoising
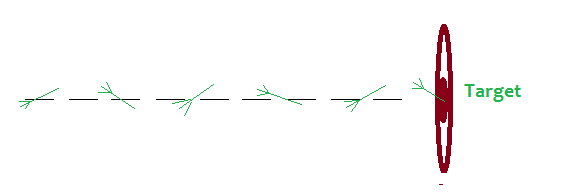
This is the first thing we’ll be looking for. Porpoising happens when the arrow alternates between rising and “submerging” relative to its intended flight path. The image below demonstrates this in action:
It’s called “porpoising” because the arrow behaves mid-flight almost like a porpoise (a mammal from the dolphin/whale family) does in water. If your arrow behaves as shown on the image above, this means that the location of your nocking point needs adjusting. Here is how to carry out the bare shaft test to solve this issue.
Step one: place a target 20 yards away and, aiming for a certain location, shoot two or three fletched arrows.
Step two: standing at the exact same distance from your target and aiming for exactly the same location as before, shoot two or three unfletched (bare shaft) arrows.
Now approach the target and take note of where your arrows landed exactly. There are two things to consider:
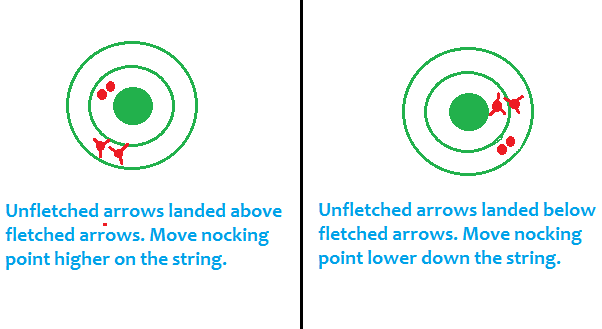
- If the bare shafts landed higher than the fletched arrows on the target, this means your nocking point is installed too low on the string. You will need to move the nocking point a little higher (start with 1/8″), and then repeat the two-step bare shaft test described above. Keep adjusting the height of your nocking point and testing until both your fletched and un-fletched arrows land at exactly the same height on the target.
- If the bare shafts landed lower than the fletched arrows, then the nocking point is positioned too high, and you will need to move it down the bowstring until both your fletched and un-fletched arrows land at exactly the same height on the target.
For this test to work, it is imperative that you always aim for the exact same spot when shooting the fletched arrows and the bare shafts; that you stand at precisely the same distance from your target each time you shoot; and that you use the exact same draw/aim/release technique.
The goal is to make sure both the fletched arrows and the bare shafts (unfletched arrows) land at exactly the same horizontal plane.
Below are images illustrating the above:
Important Note: at this point, you do not need to worry about both your fletched arrows and bare shafts landing right next to each other. You simply want both of them to land in the same horizontal plane, as this will mean you have successfully tuned your bow to avoid porpoising. For both fletched and unfletched arrows to land right next to each other, however, you also need to make sure that they are not fishtailing.
Fishtailing
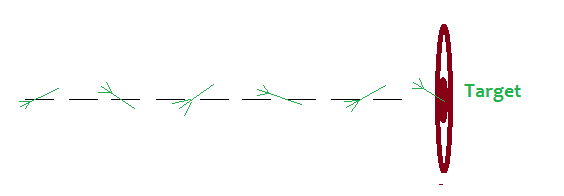
Fishtailing is kind of the opposite of porpoising, where rather than the arrow dipping up and down mid-flight, it will turn right and left. The image below illustrates this (pay attention to image caption):
To diagnose and fix fishtailing, do the following:
Step one: as before, place a target 20 yards away, aim for a specific location and shoot two or three fletched arrows.
Step two: using the exact same distance and aiming for the exact same spot on the target, shoot two or three unfletched (bare shaft) arrows.
Approach the target and take a look at where your arrows landed.
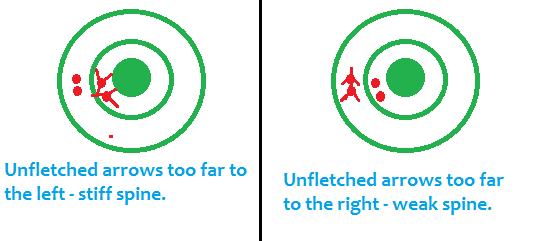
#1: If bare shafts hit the target noticeably to the left of the fletched arrows, it means your arrows have a stiff spine. Do one of the following, depending on your options:
- Reduce the tension on the plunger spring or move the rest assembly closer to the riser, thereby re-centering your arrows and moving the arrow points closer to the string.
- If your do not have a plunger or a rest assembly, you can address the issue by using heavier arrow points than what you are using. Say if yours are 100 grain, you can try 125 grain.
- Try increasing the brace height a little and see if that helps.
- If none of the above options seem to help, it likely means that you need to get arrow shafts with less spine/stiffness than your current ones.
#2: If your bare shafts hit the target noticeably to the right of where the fletched arrows impacted, it means your arrows have a weak spine. Do the reverse of what you did above:
- Increase the tension on the plunger or move the rest assembly further from the riser so as to re-center your arrows and move the arrow points further away from the string.
- If the above is not possible, get slightly lighter arrow tips and see if that helps.
- See if decreasing the brace height of your bow by 1/8″ – 2/8″ will help.
- If none of the above tweaks help despite your efforts, it means that you must get new arrow shafts with more spine/stiffness than what you have right now.
Please note: I created the images below assuming that you are using a right-handed bow. If you’re a “leftie,” everything will be reversed; unfletched arrows landing too far to the left will indicate weak arrow spines, while unfletched arrows landing too far to the right will indicate a stiff spine.
The goal at this point is to make sure that your arrows land as close to each other as possible, by making the necessary tuning adjustments and changes as described above.
What Next?
Next we will discuss proper arrow clearance and how to correct common clearance issues. Head over to Part 4 of our recurve bow tuning guide.


When analyzing fishtailing, wouldn’t it be necessary to use the same arrow type for fletched and bare since you’re looking at the relative shaft stiffness?
it is.
Years ago, when I tuned my old PSE compound (Thunderflight) I shot bare shaft through a paper sheet set in front of the target (far enough that the arrow could fully pass through before hitting the target). The resulting tear pattern gave a really nice visual of how the arrow was flying. There would be the penetration point and a tear leading away from the penetration point. It was like looking at the center of a clock that has only one hand. As you adjusted for porpoising and fishtailing you got shorter tears and eventually just the penetration hole. I found it really very effective. Looking only at the arrow once in the target bag/block may provide data that is influenced by how the arrow reacts to the target itself.
1. Do you think this method is effective? 2. If so, do you think it would be effective fo tuning a re-curve?
Don’t forget you can cut an underspined shaft to make it stiffer
Wouldn’t the fish tailing be dependent on if your right or left handed?
no, the flex would just start in the opposite direction (assuming you’re not trying to shoot the wrong handed bow anyway)
Hi,
I think the method is very effective. However, I am facing an issue. I shoot a Bear Grizzly 50@28, with 28 of draw length.I tuned my arrows (GT trad 400) at 31” and 250 g as tip weight. Bare shaft, they fly just great, straight and bull’s eye(a plate) at 25 y. Filming the flight, it is erratic…When I use my 29” arrowz, the flight looks great from behind, but they arrive with the nock right…I am lost…. Any comment?
Hey, Terry. Are you left handed? The shorter arrow will act like it has stiffer spine.
I have hunted and target shot compound for years but am having a challenge shooting Olympic recurve with fletching consistently left of impact. I am right handed.
The only thing missing here is a description of changing the draw weight by adjusting the limb bolt settings to bare shaft tune. If the arrows are showing weak screw the bolts out, strong screw the bolts in. Don’t forget to check the tiller setting after each adjustment.
Great guide I’ve been shooting for about 6 months and just bought my own bow so just trying to find a guide to tuning it, the shop help set it up but my little lad bent the arrow rest and so I need to learn to work it and the plunger to get them back on line, and your guide is the most straight forward I’ve found for a newbi so cheers
Good day Terry, I have a dozen Chinese arrows in 500 spine by 32″ long, predator 450 by CE. I have spent the day trying to tune these arrows to my bear kodiac take down 42lbs @28″. Firstly I tried 100g points, now ending with 85g, the 3 fletched arrows are grouping well on target but the unfletched arrows start their flight on track for the aim point then drop away quickly to the right, there is no difference between the impact points and the lighter/heavier points. distance is at 20yards
Please advise
Many thanks
Deryck Siddons
Terry
I have tried til I just don’t have anymore patience in trying to tune my arrows.
I get to the point where I’m looking at the fletch and bare shaft and the arrows still go right alot.
I have a galaxy creacent bow 40# at 28. I draw 30.5. 500 and 400 bare shafts land right. I’m beginning to think this whole tuning thing is BS.